


In this tutorial, I demonstrate the process of building a Server-Driven UI (SDUI) using Flutter, Figma, and Firebase Remote Config. This solution allows the app's UI to be modified without going through a full build, test, and deployment cycle
What we will build
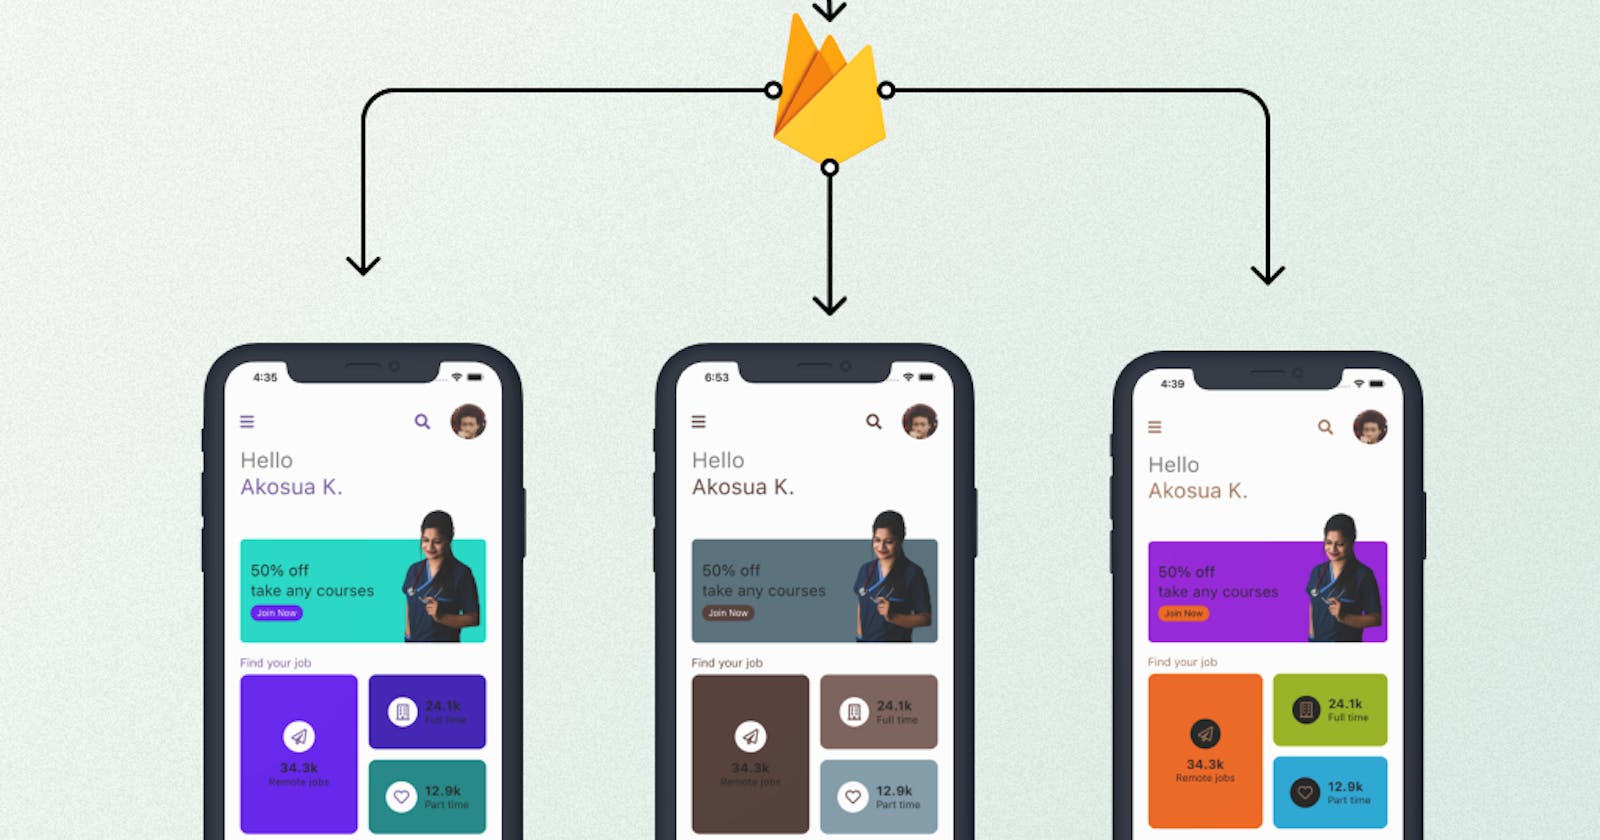
We will develop a solution to drive UI changes in our production Flutter app from Figma without going through a build, test, deploy cycle
Why? - Server Driven UI
Typically the layout and presentation of our app is coded in our app binary and submitted to the Google Playstore or Apple AppStore. This means every time we want to make a change to how our app looks, we would have to go through a complete deploy cycle which can take weeks to even months. For simple UI changes, this may simply not be worth the effort. Server-driven UI is a technique that allows us to bypass these challenges. In a full server-driven UI implementation the layout and presentation of our app are fetched from the server just like any other resource and interpreted by the app. Today we will develop a basic SDUI solution to change the theme of our Flutter app by leveraging Firebase Remote Config. As a bonus, we will also develop a solution to change this theme straight from Figma.
Getting Started
To follow along with this tutorial, clone the starter project from this GitHub repo. Build and run the app on an emulator or physical device. You will be presented with this layout.

Now create a Firebase project and configure your app for Firebase by following the official guide at FlutterFire and setupRemote Conifig. Remote Config is a Firebase service that lets you publish key-value pairs to your app to control appearance or behaviour. Once everything is set up let’s take a look at our app’s code. In the main.dart file, we have defined a theme by defining a color scheme.
return MaterialApp(
  title: 'Theming Demo',
  theme: ThemeData.from(
      colorScheme: const ColorScheme(
          primary: Color(0xFF6200EE),
          primaryVariant: Color(0xFF3700B3),
          secondary: Color(0xFF03DAC6),
          secondaryVariant: Color(0xFF018786),
          surface: Color(0xFFFFFFFF),
          background: Color(0xFFFFFFFF),
          error: Color(0xFFB00020),
          onPrimary: Color(0xFFFFFFFF),
          onSecondary: Color(0xFF000000),
          onSurface: Color(0xFF000000),
          onBackground: Color(0xFF000000),
          onError: Color(0xFFffffff),
          brightness: Brightness.light)),
  home: const Home(),
)
We will replace this color scheme with the ones we fetch from Remote Config. We start by setting defaults for our color scheme. This is to ensure there is a color scheme present the first time we launch our app before a fetch has occurred. We set the fetch interval to one minute and call fetch before runApp so we can see the results immediately. This is likely not the configuration you will use in your app.
void main() async {
  WidgetsFlutterBinding.ensureInitialized();
  await Firebase.initializeApp();

  FirebaseRemoteConfig remoteConfig = FirebaseRemoteConfig.instance;
  await remoteConfig.setDefaults(<String, dynamic>{
    "colorScheme": jsonEncode({
      "primary": 0xFF6200EE,
      "primaryVariant": 0xFF3700B3,
      "secondary": 0xFF03DAC6,
      "secondaryVariant": 0xFF018786,
      "surface": 0xFFFFFFFF,
      "background": 0xFFFFFFFF,
      "error": 0xFFB00020,
      "onPrimary": 0xFFFFFFFF,
      "onSecondary": 0xFF000000,
      "onSurface": 0xFF000000,
      "onBackground": 0xFF000000,
      "onError": 0xFFffffff,
    })
  });

  //Set fetch interval to 1 minutes and call fetch so we can see the changes immediately
  await remoteConfig.setConfigSettings(RemoteConfigSettings(
    fetchTimeout: const Duration(seconds: 10),
    minimumFetchInterval: const Duration(minutes: 1),
  ));
  await remoteConfig.fetchAndActivate();

  runApp(const MyApp());
}
We store our color scheme as a JSON Encoded String because currently, setDefaults only supports booleans, strings and numbers. Our hex number codes are also automatically converted to integer equivalents because JSON does not support hex values. Storing them as strings would have also worked. Next, in MyApp widget we replace our previously defined color scheme with ones from Remote Config making sure to decode our JSON string beforehand.
class MyApp extends StatelessWidget {
  const MyApp({Key? key}) : super(key: key);

  @override
  Widget build(BuildContext context) {
    FirebaseRemoteConfig remoteConfig = FirebaseRemoteConfig.instance;
    final colorScheme = jsonDecode(remoteConfig.getString("colorScheme"));
    return MaterialApp(
      debugShowCheckedModeBanner: false,
      title: 'Theming Demo',
      theme: ThemeData.from(
          colorScheme: ColorScheme(
              primary: Color(colorScheme["primary"]),
              primaryVariant: Color(colorScheme["primaryVariant"]),
              secondary: Color(colorScheme["secondary"]),
              secondaryVariant: Color(colorScheme["secondaryVariant"]),
              surface: Color(colorScheme["surface"]),
              background: Color(colorScheme["background"]),
              error: Color(colorScheme["error"]),
              onPrimary: Color(colorScheme["onPrimary"]),
              onSecondary: Color(colorScheme["onSecondary"]),
              onSurface: Color(colorScheme["onSurface"]),
              onBackground: Color(colorScheme["onBackground"]),
              onError: Color(colorScheme["onError"]),
              brightness: Brightness.light)),
      home: const Home(),
    );
  }
}
Next go to the Firebase Console, select your project and add a new Remote Config Parameter called “colorScheme”. The value of this parameter is a JSON string matching the structure of our Flutter color scheme. Ensure the color values are integers. Publish your newly added changes to make them available to your app.
Once your changes have been published, you can go to your app and hot restart it to see the new color scheme take effect.
Publishing Color Schemes from Figma
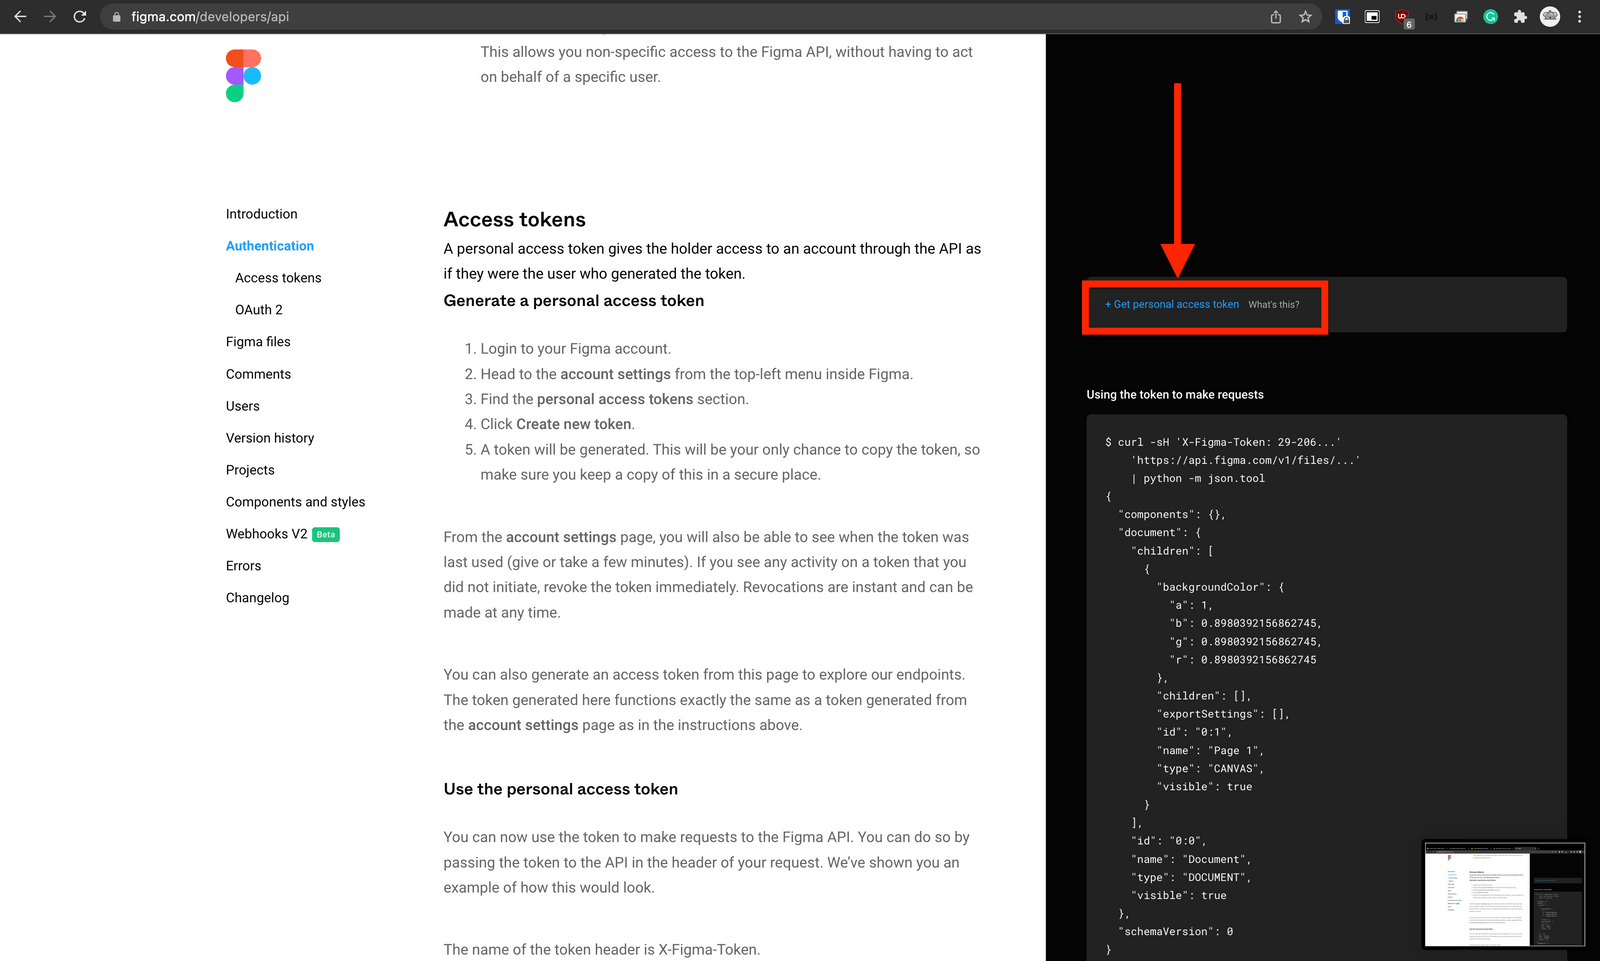
Now that we can publish new color schemes remotely to our production app, let’s take things further by automating the process while giving our designer colleagues more control. We will use Figma’s API to listen to and fetch color changes from a Figma Style and publish to Remote Config. We will use Cloud Functions for Firebase, a serverless framework for our webhook and API calls although the code should work with any node.js server with minimal changes. You will need to be on the Blaze Plan to use Cloud Functions. You will also need to have a Figma Education or Professional Plan to be able to use Figma webhooks. If you are a student, grab a free Figma Education Plan here. If you are unfamiliar with Firebase Cloud Functions, get started by following the official guide. Once you have set up Cloud Functions, go to the Figma API Portal to grab an access token.
Create a new Figma design file under your education or professional team. Create a Color Style representing your Flutter Color Scheme. Learn how to create a Figma Color Style here. Next, create a new Frame. Rename your Frame and Page to something descriptive. Create twelve rectangles and fill each with a different color from your style (We will see why soon). Rename the rectangles to reflect their fill. The names should be identical to the keys used in our Remote Config parameter. Take note of your Figma File Key as well as this will become important. Your file key is embedded in the URL to your file like so https://www.figma.com/FILE_KEY/FILE_NAME. See the image below for more details.

Next, we will go ahead and create a webhook that receives notifications whenever changes to our Figma Color Style is published. We will use an HTTPS Cloud Function to do this. First, create or generate a passcode to use as our Figma Passcode. Figma will provide this passcode whenever it calls our webhook and thus we can use it to validate the request. The passcode cannot exceed 100 characters. Add the Google PubSub NPM Module to your Firebase Project. Whenever our webhook is called we will publish a pubsub event and trigger the function that saves our Remote Config. We do this so we can return an OK Status Code (200) to Figma as soon as possible to avoid timeouts and retries. Our Firebase Function will look like this.
const functions = require("firebase-functions");
const {PubSub} = require("@google-cloud/pubsub");

const pubSub = new PubSub();

const figmaPasscode = "PASSCODE_GOES_HERE";
const figmaFileKey = "FILE_KEY_GOES_HERE;

exports.figmaHook = functions.https.onRequest(async (req, res) => {
  if (req.body["file_key"] === figmaFileKey &&
      req.body["event_type"] === "LIBRARY_PUBLISH" &&
      req.body["passcode"] === figmaPasscode) {
    const dataBuffer = Buffer.from(JSON.stringify(req.body));
    await pubSub.topic("modifyColorScheme").publish(dataBuffer);
  }

  res.status(200).send();
});
Deploy the function to Firebase and log on to the Firebase Console to get its URL.

Next, submit your webhook to Figma by visiting the API Webpage. You will be greeted with a form like the one below. Click “+ Get personal access token” to automatically insert one.

The “event_type” we need is “LIBRARY_PUBLISH”. You can get your “team_id” by selecting your team on your Figma dashboard and copying it from the URL.

Our webhook is now configured and will receive a request with “event_type” “PING” as confirmation. Next, we will create a pubsub function to save and publish our remote config. We will use the axios npm package to make requests to the Figma API and our function will look something like this.
const functions = require("firebase-functions");
const admin = require("firebase-admin");
const axios = require("axios");
const figmaFileKey = "FIGMA_FILE_KEY;

const figmaAccessToken = "FIGMA_ACCESS_TOKEN;
const pageName = "PAGE_NAME";
const canvasName = "CANVAS_NAME";

const rgbToHex = (a, r, g, b) => [a, r, g, b].map((x) => {
  const hex = Math.round((x * 255)).toString(16);
  return hex.length === 1 ? "0" + hex : hex;
}).join("");

exports.modifyColorScheme = functions.pubsub
    .topic("modifyColorScheme").onPublish(async (message, context) => {
      const fileRes = await axios({method: "get", url: `https://api.figma.com/v1/files/${figmaFileKey}`,
        headers: {"X-FIGMA-TOKEN": figmaAccessToken}});

      if (fileRes.status === 200) {
        const data = fileRes.data;


        const page = data.document
            .children.find((page) => page.name === pageName);
        const canvas = page
            .children.find((canvas) => canvas.name === canvasName);
        if (canvas.children) {
          const shapes = Array.from(canvas.children);
          const colorScheme = {};
          for (const shape of shapes) {
            const name = shape.name;
            const a = shape["fills"][0]["color"]["a"];
            const r = shape["fills"][0]["color"]["r"];
            const g = shape["fills"][0]["color"]["g"];
            const b = shape["fills"][0]["color"]["b"];

            colorScheme[name] = parseInt(rgbToHex(a, r, g, b), 16);
          }

          const configTemplate = await admin.remoteConfig()
              .getTemplate();
          configTemplate.parameters["colorScheme"] = {
            defaultValue: {
              value: JSON.stringify(colorScheme),
            },
          };
          await admin.remoteConfig().publishTemplate(configTemplate);
        }
      }
    });
We query Figma for the file with our shapes. This is because when we query Figma for Color Styles, it doesn’t return the actual color values, just names and keys. This is why we needed those shapes. Once we have the file, we can inspect it for the shapes and check their fills. Since we named the shapes the same as our Flutter Color Scheme keys, we know which shape corresponds to which property. Figma returns the colors as RGB values, each value a floating-point number between 0 and 1. We convert the color to hex and finally to integers and save it to remote config. Finally, we have fully automated publishing color schemes from Figma to Flutter. Let’s see it in action.
Extras
Source Code
All source code is available publicly to be cloned and modified and improved. Clone the Flutter Project here and the Firebase Project here.
Credits
The UI for the flutter app was inspired by this Dribble design. The photograph of the nurse was taken by Doctor Mako. The profile avatar photo was taken by Prince Akachi.